Showing posts with label Cakes. Show all posts

Tuesday, December 6, 2011

Christmas Cake....


Christmas is almost here and my 8 week cake decorating class is over. Did it ever go quick, it was something I was really glad that I finally did. I did learn a lot and here are some of the fruits of my labour. My teacher Betty's Cake recipe is the one we used in the class to bake and cover etc , so I am spreading the Christmas cheer by sharing her recipe, it is a basic recipe so dont expect all the bells and whistles.It still turned out delicious and the more in advance that you make it before the big day , the more the cake will sing in  your mouth with each bite.

1kg + 200g mixed fruit
200g butter
100g white sugar
100g brown sugar
4 eggs
4TBSP Of Rum/Brandy/Sherry or Whiskey
300g Plain Flour
1/2 tsp baking powder
1/2 tsp nutmeg
1/2 tsp mixed spice
a good pinch of salt


Prepare the Fruit the day before the cake is made. Sprinkle with the Rum /Brandy/Sherry (The longer you leave the fruit to soak the better)

Preheat oven to 140-150 C
Beat the butter and both sugars to a soft cream.Add the unbeaten eggs one at a time. Beating well after each addition add half the fruit .

Sift the Flour,baking powder,salt and spices, add half to the mixture then the remaining fruit and the the remainder of the flour. Mix well

Place into a baking tray which has been lined with baking paper and well greased with butter and dusted with flour.


Bake in the lower half off the oven for 3-3.5 hrs or until done (In my fan forced oven it was done in about 2 hours).

Friday, November 18, 2011

Brooklyn Blackout Cake

Happy Birthday to my sister and one of my best friends, as far as sisters go I have to say I gotta pretty lucky with the two that I have. One is fiery and just dares you too hurt the one's she loves the other calm and rational but just as protective! It is the calm ones birthday (ahem calm most times ) and I try to make her cake almost every year and this year she has chosen the Brooklyn Blackout Cake from my Hummingbird Bakery Cook Book. I must admit it does look a bit intimidating , but what the Birthday girl wants the Birthday girl gets ! 
When we were growing up we always had this rule , that for the 24hrs of a birthday we all had to be super nice to the birthday girl which ever one of us it was. All sibling rivalry was put to rest for those 24 hrs, which of course meant the birthday girl would take full advantage of this .The rest of the siblings would have their patience tested and we would be sitting there waiting for the truce to be over,not to mention waiting for when it was our turn to be the birthday girl So in the spirit of that tradition , I am starting my being super nice early by taking on this cake.


Confession time , I didn't have quite enough to slice of my cakes for the topping so off to the shops I went. I bought a plain chocolate cake and sliced a thin layer of the cake and popped it into the food processor and taah dahh instant cake topping.


Someone else had already kindly typed up the recipe , which I got from Food Made With Love blog. Here it is !


Recipe:
(From The Hummingbird Bakery Cookbook)


ingredients:
100g unsalted butter, at room temperature
260g caster sugar
2 eggs
1/4 teaspoon vanilla extract
45g cocoa powder
3/4 teaspoon baking powder
3/4 teaspoon bicarbonate of soda
a pinch of salt
170g plain flour
160 ml whole milk


chocolate custard:


500g caster sugar
1 tablespoon golden syrup
125g cocoa powder
200g cornflour
85g unsalted butter
1/2 teaspoon vanilla extract


also need:
3x20cm cake tins, base-lined with greaseproof paper


Steps :


1. Preheat oven to 170 degrees celcius (Gas 3)


2. Put the butter and sugar in a freestanding electric mixer with a paddle attachment (or a handheld electric whisk)
and cream until light and fluffy.
Add the eggs one at a time, mixing well and scraping any unmixed ingredients from the side of the bowl
with a rubber spatula after each addition.
Turn the mixer down down to slow speed and beat in the vanilla extract, cocoa powder,
baking powder, bicarbonate of soda and salt until well mixed.
Add half the flour, then all the milk, and finish with the remaining flour.
Mix well until everything is well combined.


3. Pour the mixture into the prepared cake tins and smooth over with a palette knife.
Bake in the preheated oven for 20 mins.
Leave the cakes to cool slightly in the tins
before turning out onto a wire cooling rack to cool completely.


4. For the chocolate custard: Put the sugar, golden syrup, cocoa powder and 600ml of water
into a large saucepan and bring to the boil over medium heat, whisking occasionally.


5. Mix in the cornflour with 120ml of water, then whisk into the cocoa mixture in the saucepan.
Bring back to boil , whisking constantly.
Cook until very thick, about 10 minutes.
Remove from heat and stir in the butter and vanilla extract.
Pour the custard into a bowl, cover with clingfilm and chill until very firm.


6. When the cakes are cold, using a serrated knife, slice a thin layer off one of the cakes.
Put this layer into a food processor and process to make fine crumbs.
Put one cake on a cake stand and spread about one-quarter of the chocolate custard over it with a palette knife.
Place a second cake on top and spread another quarter of the custard over it.
Top with the last cake and spread the remaining custard over the top and sides.
Cover with the cake crumbs and chill for about 2 hours.

Monday, November 7, 2011

Carrot Cake Cupcakes


Before I went traveling my sister and cousins who are more like my sisters than cousins decided to have one last little get together before I ventured on my way . The task was we each had to bring something and I thought what better than Carrot cake cupcakes.

I used the recipe from one of my earlier posts with  a few changes. For the recipe please check out  Cheeky Carrot Cake. This time I soaked the grated carrots in Rum and left out the walnuts. Every time I make it I try cut down the sugar even more in a bid to be healthier .It seems to be working I was told it was the best carrot cake they had ever tasted which is a massive compliment which I of course was thrilled with. So if you love Carrot cake you will love this recipe.

Monday, October 31, 2011

Chocolate & Pumpkin Polenta Cake

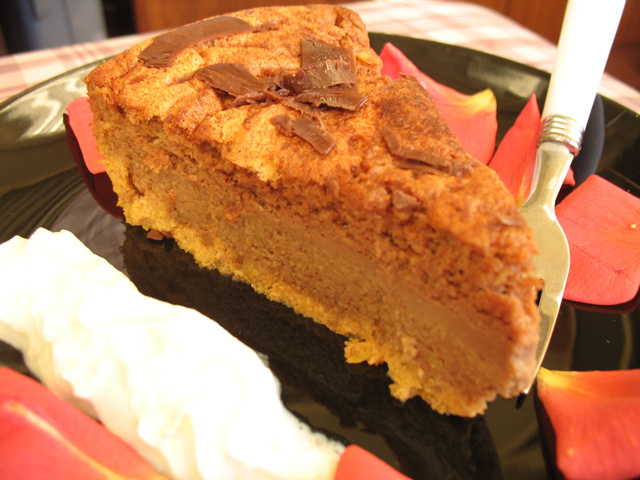
Halloween is here  and I have been trying to come up with a new fascinating way to use pumpkin in a dessert. This latest creation was based off a recipe I found on allwomenstalk.com, I just made a few changes here and there, but it is a great recipe and you should give it a go. You may be suspicious of the fact that it uses polenta.I would not blame you I did have my doubts . It is nice to be proven wrong once in awhile. The cake was moist and so comforting with the fresh cream yum! I may just add one egg next time and would love to use dark chocolate just to see how different it would turn out.If your looking for something a little different this Halloween why not try this delicious ,Chocolate & Pumpkin Polenta Cake.


Ingredients of Chocolate Polenta Cake:

1 cup water
1/4 cup Polenta
1/2 cup (1 stick) butter  softened
 6 oz Milk chocolate chopped
1 teaspoon vanilla extract
1/4 cup Brown Sugar
4 large egg yolks
5 large egg whites
2 tablespoons granulated sugar
Sweetened whipped cream (to serve)
2 oz. shaved chocolate to decorate


    Pumpkin Filling
    1 package (3 oz) cream cheese, softened 
    1/2 cup canned pumpkin (not pumpkin pie mix) 
    1 egg yolk
    1 whole egg 
    3 tablespoons sugar 
    1teaspoon ground cinnamon
    1/4teaspoon ground nutmeg
     

    Method

    1. Preheat oven to 160° C. Grease 9-inch spring form pan.
    2. Combine water and cornmeal in small saucepan. Cook over medium heat, stirring occasionally, until mixture comes to a boil about 3 to 4 minutes. Reduce heat to low. Cover; cook for 5 to 7 minutes or until mixture is thickened. Remove from heat; let stand 2 minutes. Add butter, chocolate and vanilla extract; stir until melted. Cool completely.
    3. Combine 1/4 cup sugar and egg yolks in small mixer bowl. Beat at medium speed for 3 to 4 minutes or until mixture is thick and creamy. Stir in chocolate mixture.
    4. Beat egg whites in large mixer bowl at high speed until soft peaks form. Continue beating; gradually add 2 tablespoons sugar. Beat until glossy and stiff peaks form. (DO NOT OVER BEAT.) Gently stir in chocolate mixture. Pour mixture into prepared spring form pan.
    5. Meanwhile in separate bowl cream the cheese and add the egg yolk and whole egg , add the spices and sugar and whisk till smooth.Gently pour the mixture into the cake pan without stirring.
    6. Bake for 1 to 1.5 hours minutes or until cake is set in center. Cool completely in pan on wire rack. Remove side of pan. Serve with whipped cream. Sprinkle with chocolate
     

    Sunday, December 19, 2010

    Heavenly Oreo Cheesecake

                                                                                                                                by the Konstant Kraver
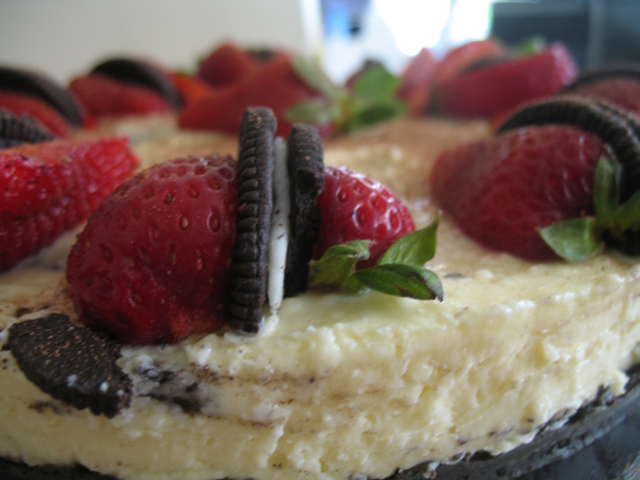
    I dont think I have met a person yet who doesn't like Oreo's and when made into a cheesecake they are even more heavenly. This recipe was adapted slightly from the Philadelphia Cream Cheese cook book. It is the perfect thing  to whip up when you are pressed for time but still want to produce a show stopping dessert.

    INGREDIENTS

    450g OREO Original Cookies
    100g melted butter
    375g PHILADELPHIA Block Cream Cheese , softened
    ½ cup caster sugar
    1 tsp. vanilla essence
    1 cup Cream
    3 tsp. gelatin( dissolved in 1/4 cup boiling water)
    200g(7oz)White chocolate, melted and cooled slightly
    Strawberry's, for decoration
    Extra OREO broken for decoration , if desired


    METHOD
    1.Place 250g of the OREO cookies in a food processor and process into fine crumbs. Add the butter and process to combine.Press the mixture into a greased and lined 18cmx28cm slice pan and chill


    2.Beat the PHILLY sugar and vanilla with an electric mixer until smooth, then beat in the cream.Stir through the gelatin and white chocolate.

    3.Roughly chop the remaining cookies and stir through the filling.Then pour over the OREO cookie base.Refrigerate 3 hours until set.Decorate with strawberries and the extra OREO cookies. Serve immediately.

    Sunday, December 12, 2010

    Cheeky Carrot Cake

                                                                                                                                     by the konstant kraver

    A delicious moist carrot cake with the ever so cheeky shot of sherry which just makes all the flavours in this cake sing.


    Ingredients

    3 cups grated carrots

    ½ cup brown sugar

    2 eggs

    3/4 cup white sugar

    1/2 cup vegetable oil

    1 tsp vanilla extract

    1 Tbsp Sherry

    ½ tsp Ginger Powder

    1-1/2 cups all-purpose flour

    3/4 tsp baking soda

    ½  tsp salt

    2 tsp ground cinnamon

    2/3 cup chopped walnuts

    For Decoration

    1/4 cup whole walnuts
    3 tbsp sugar

    250g cream cheese

    3/4cup icing sugar

    1tsp vanilla essence

    ¼ tsp ginger powder


    1. In a medium bowl, combine grated carrots,sherry and brown sugar. Set aside for 60 minutes.
    2. Preheat oven to 350 degrees F (175 degrees C). Grease a medium size bundt tin .In a large bowl, beat eggs until light. Gradually beat in the white sugar, oil and vanilla. the. Combine the flour, baking soda, salt and cinnamon, stir into the wet mixture until absorbed. Finally stir in the carrot mixture and the walnuts. Pour evenly into the prepared pan.
    3. Bake for 45 to 50 minutes in the preheated oven, until cake tests done with a toothpick. Cool for 10 minutes before removing from pan. When completely cooled, frost with the cream cheese frosting.
    4.  Heat 3 tbsp of sugar in pan until it melts and turns into toffee. Add walnuts and coat. Turn out onto baking paper and refrigerate until the toffee sets.
    5. Beat cream cheese and icing sugar until well combined.Mix in the vanilla essence and the ginger powder.
    6. Spread the icing all over the cake and top with the toffeed walnuts.
    Enhanced by Zemanta

    Sunday, November 28, 2010

    Chocolate Green Apples

                                                            by the konstant kraver


    When were kids , mum always used to tell us bout these chocolate apples cakes my dad used to bring her, this bakery luckily was still around and we got to sample them . This is my take on them using my favourite shortcut product of the moment . Nestle TopN fill no more anxiously biting your finger nails trying to make caramel from scratch..phew


    Ingredients
    4 cups cake crumbs (2x 250g Coles Choc Mini Roles )
    1 can 380g Nestle TopN fill (You will only use about 1/2 -3/4 of the can )
    2tsp brandy or brandy essence
    12 White Cupcake cases

      To Decorate

      1 cup sifted icing sugar
      2oz butter
      1tsp green colouring
      2tbls milk
      handful of cloves


      Method

      1. Break up the mini rolls and place in a food processor. Process until finely chopped, this will take about 10 seconds. Transfer to a mixing bowl, then stir in the brandy and let it sit for about 10 mins
      2. Open up your can of you caramel and warm  up about 3/4 of the can in the microwave for about 15 seconds (Make sure you transfer it out of the can and into a microwave safe container).

      3.Combine the warmed caramel with cake crumbs and mix well. Divide into 12, then use clean hands to roll the mixture into balls that sort of resemble little apples. Line 12 muffin pan with the white cases , and place each rolled ball into the the cases

      4.To decorate: Place the icing sugar , butter and milk into a small saucepan and cook on a low heat whisking all the time till it is just about to reach boiling point. Take of the heat and  add the vanilla essence and the colouring and whisk. Working quickly because the icing will set pour it gently over the the rolled balls of cake crumbs in the cupcake cases.

      5.To finish off the apple places a clove in the center of each as the stem. Refrigerate until set.

      Sunday, November 21, 2010

      Edgars Reggae Cake

                
                                                                                                            by the konstant kraver

      I have a friend who is pretty much obsessed with two things: Reggae and Coffee. So for his birthday I thought it would be fun to try to incorporate the two. The result was a fun, colourful cake that not only looked amazing and was a show stopper when it was cut open but tasted awesome…so I am told. The cake recipe was one adapted from Cheftalk.  
      The original icing I used was  a boiled coffee butter icing, which, I quickly learned, although it tastes fantastic is more suited to just pouring on a cake and letting it set: after many trials, I finally had to take a creative approach to make it work. I think next time just a simple coffee butter icing would be easier; I found such a recipe which has been adapted from Little Potbelly and included it below for anyone who wants to try it out.

      Reggae Cake

      2 ¼ cups all-purpose flour (do not sift the flour)
      1 ¼ cups granulated sugar
      3 ½ tsp baking powder
      1 tsp salt
      1 ¼ cups milk
      Vegetable oil
      1 stick butter (not margarine), softened
      1 Tbsp vanilla extract
      4 medium sized eggs
      2 tsp red colouring
      2 tsp yellow colouring
      2 tsp green colouring


      250g unsalted butter, at room temperature
      2 Tbsp milk, at room temperature
      1 tsp Vanilla essence
      4 tsp instant espresso powder, dissolved in a small amount of hot water
      500g icing sugar, sifted

      1. Preheat oven to 175°C
      2. Cut wax paper to fit the bottom of (3) 9 x 1 1/2-inch round pans. Spray the pans with cooking spray, place the wax paper in the pans and spray the paper.
      3. In a large mixing bowl combine the flour, sugar, baking powder and salt, mixing well.
      4. Measure the 1 ¼ cups of milk in a 2 cup measuring cup….then add enough vegetable oil to bring the liquid up to 1 1/3 cups.
      5. Add the milk/vegetable oil mixture, butter and vanilla to the flour mixture and beat with an electric mixer on medium to medium-high speed for 2 minutes, scraping sides of bowl as needed.
      6. Add the eggs and continue beating an additional 2 minutes. Divide the batter among 3 bowls and add the different colourings to each bowl and stir till you get lovely vibrant colours.
      7. Pour batter into prepared pans.
      8. Bake at 175°C for 20 to 25 minutes or until a wooden pick inserted near center of cake comes out clean, or until cake springs back when touched lightly in the center.
      9. Cool cakes on wire racks for 15 minutes; remove from pans and cool completely.
      10. In a large mixing bowl beat the butter, milk, espresso mixture and half the icing sugar until smooth.  Gradually add the remainder of the icing sugar to produce a butter-cream of a smooth and creamy consistency.
      11. Spread a generous amount of icing in between the layers and assemble the cake. Next use the remaining icing to cover the cake. Decorate with any red, yellow and green sprinkles you can find in keeping with the Reggae theme.

      Saturday, October 30, 2010

      Pumpkin Crepe Cake Recipe

                                               by the Konstant Kraver

      A Pumpkin Crepe cake? That sounds crazy you might think, it was an idea inspired by one of my favourite Chefs Karen Martini and this recipe I came across from the blog Sugarlaws.

      I have never made crepes before and was quite thrilled with how they came out . They were not perfect but a very good starting point in my opinion. This simple no bake cake is fantastic especially served up with some fresh cream..sooo yum!

      INGREDIENTS:
      For Crepes: 
      4 eggs
      2 cups skim milk
      2Tbsp icing sugar
      1 1/4 cup flour
      2 tsp butter melted
      1 tsp ground ginger
      1tsp vanilla  essence
       walnuts to decorate

      For Pumpkin Filling:
      1 can pumpkin puree (15 ounces) or 450g pumpkin (Cut peeled and boiled still soft enough to mash)
      1/3 cup brown sugar
      1/4 tsp nutmeg
      1/2 tsp cinnamon
      1/3 cup skim milk

      For Chocolate Ganache:
      125g dark chocolate
      30g cold butter
      150ml cream
      pinch of cornflour


      DIRECTIONS:
      1. Whisk together eggs, milk, flour,icing sugar, ginger,vanilla essence and butter. Refrigerate.

      2. In a microwave-safe container, mix pumpkin, sugar, nutmeg, cinnamon and milk. Microwave for approximately 1 minute, until heated through, and stir.Set the pumpkin filling aside.

      3. Coat a skillet or small saute pan with cooking spray, and place on a burner over medium heat. Pour about 1/4 cup of crepe batter into the pan, tilting to coat the pan’s surface. Cook about 1 minute, flip, and cook for roughly another minute.

      4. Remove crepe from pan, place on a serving plate. Repeat step 3 with the remaining batter, making roughly 18 crepes in total.Leave aside to cool for about 10 minutes.  

      5. Now ASSEMBLING IT-This has to be assembled on the platter it will be served on because once it is up you wont be able  to shift it.
      6.To start off, place about a 1Tbsp of the pumpkin filling on the center of the platter and smear it in a circle so the first crepe will be held in place.Place the crepe on top of the pumpkin filling then spread over another 1 or 2 Tbsp of the pumpkin over the crepe and spread it out and place the next crepe on top.Repeat until all are done.

      7. Chop up the dark chocolate and place it in a bowl with the butter and pop it over a pot of simmering water and gently melt the chocolate and butter,make sure the bowl is not touching the water.

      8.Once that is done add the cream and a pinch of cornflour.Stir it all together till you have a glossy thick ganache.

      9.Pour over the chocolate ganache on top of the last crepe and spread all around making sure the top is covered nicely. Place walnuts on top

      10. Leave to set for about 20 minutes , slice and serve with fresh cream


      Friday, September 24, 2010

      Brandied Blueberries & White Choc Chip Brownies !!


      KITCHEN KRAVINGS KREATIONS UPDATE

      Before you make these I have to warn you they are so intense and decadent that even the biggest chocolate addict among you may have trouble having more than one, but in saying that you may find it difficult to stop at just one one!

       
      INGREDIENTS
      • 200g/7oz dark chocolate
      • 150g/5¼oz plain flour
      • 30g/1oz cocoa, sifted
      • 1 tsp bicarbonate of soda
      • ½ tsp salt
      • ½ tsp instant coffee
      • 150g/5¼oz unsalted butter, softened
      • 225g/8oz brown sugar
      • 1/3 cup brandy
      • 225g/8oz blueberry's
      • 1 tsp vanilla extract
      • 1 egg 
      • 170g/6oz  white chocolate chips
      METHOD
      1. Place the blueberries in a shallow dish  pour the brandy over them and cover it with cling film and place it in the fridge overnight or for at least 2 hours
      2. Preheat the oven to 170C/325F/Gas 3. Grease a square baking dish with butter and grease proof paper.
      3. Break the 200g/7oz dark chocolate into pieces and place into a heatproof bowl with the instant coffee set over a pan of barely simmering water, stirring occasionally, until it has melted.Set it aside.
      4. Place the flour, cocoa, bicarbonate of soda and salt into a large bowl and mix well.
      5. Blueberries and white choc chips
      6. In another bowl, cream the butter and sugar together until light and fluffy. Beat in the vanilla extract and the egg.
      7. Add the melted chocolate and stir well, then mix in the dry ingredients. Finally fold in the  white chocolate chips and the blueberries with the juice.Pour mixture into the prepared baking dish and smooth en the top.
      8. Transfer to the oven and bake for 25-30 minutes, then test with a skewer - it should come out semi-clean and not wet with batter. If you pierce a chocolate chip, try again.
      9. Brownie mixture ready for the oven
      10. Leave the brownies to cool in the baking tray for 10 minutes, then cut them into squares and allow them to cool completely 


      After Thoughts
      • If you cant get your hands on blueberries I am sure cherries or even strawberries would work. I would have loved to try it with some mull berries
      • If you feel there is too much liquid from the blueberries which have been soaked in brandy just add as much of the liquid as you like
      Enhanced by Zemanta

      Friday, July 23, 2010

      Cake...Glorious. Birthday Cake!


      Chocolate Raspberry Cake
      Cake...Glorious cake.....there really isn't anything better

      July in my household is offically "The Month of Cake "due to the numerous birthdays. I am sure if that reason did not exist we would find some other excuse to gorge ourselves on fantastic delights. By the end of July the word "cake" is usually spoken in hushed tones as if one is afraid merely mentioning it will magically cause a hundred cakes to be lined up outside our front door! Having said that… what better topic to do a review on than cakkkkess? I have to say out of all the cakes sampled this month thus far, only three stand out. The first of which one is a Chocolate Raspberry Cake, the second, more a tart than a cake, was Almond and Orange ...lovely… and finally, and by no means least, a dark,white and milk chocolate layered mousse cake….called the Grand Finale , from Cakes Online Australia
      I do think it is slightly unfair to pit the Orange and Almond tart against these two chocolate dynamos but it was fantastic  and perfect when you want something not-too-sweet. The winner for me has to be the Chocolate Raspberry Cake from Saint Germaines Patisserie in Redfern.
      Almond and Orange Tart
      Sure it doesn't look as pretty as the Grand Finale from Cakes Online  Australia but there was just something about it. It really was hard to pick one as all three was soooo good, but the Chocolate Raspberry Cake  just had a certain element of freshness, two moist chocolate cakes sandwiched together with what I think (can’t be 100 % certain ) is a chocolate ganache icing and the freshest, plumpest raspberries. The Grand Finale Cake was fantastic but in my humble opinion  had too many fancy swirls so the first time I ate it,  I felt sick before even getting to the cake, it was only afterward when I sampled the cake on its own that I truly appreciated it, which I guess is my own fault since I was distracted by all those pretty chocolate swirls and curls.
      Grand Finale
      There always has to be a favourite and the favourite is the Chocolate Raspberry from  Saint Germaines Patisserie.Perhaps part of the reason being the care it took to balance the thing on a crowded train and still managing to get it home relatively unscathed. That takes skill! A bond was formed!
      Enhanced by Zemanta